Wanting to switch things up for breakfast? This breakfast board, also known as a breakfast charcuterie board or breakfast platter, is the perfect way to win everyone over before you start your day. In just a few simple steps I’m teaching you how easy it is to assemble a board in under 30 minutes. This post is sponsored by Cricut. All thoughts and opinions are my own.
Updated: July 1, 2022

What is a breakfast board?
A breakfast board is exactly what it sounds like, a board filled with delicious breakfast foods that your family will enjoy. It also goes by a few other names, Some call it a breakfast platter, grazing board, brunch board, or a breakfast charcuterie board. They all are basically the same. It’s similar to a charcuterie board. However instead of being filled with meats and cheeses, it is a board with an assortment of breakfast and brunch foods.
I’m a sucker for a delicious spread. Whether it’s dessert board, taco board, or even a holiday themed board I’m here for it. Your breakfast board can be themed around one specific breakfast food like waffles or fluffy pancakes, or it can be a variety of different foods that your family loves. They are perfect for every day or even special occasions.
A few reasons my family loves them:
The very first time I made a breakfast board my kids were so confused by the concept. Typically I make traditional breakfast dishes and serve everyone individually. I started making breakfast grazing boards because it takes the stress out of breakfast for us. Sometimes my kids want so many different things for breakfast that it’s hard to keep up with them. Making a breakfast board allows my kids to graze without having to pick 1 or 2 single dishes that they want for breakfast. I can incorporate small portions of different food groups to make sure they’re getting enough energy to start the day.
Not only is a breakfast board an easy solution to starting the day but it’s fun for the kids as well. They’re bright and colorful, and a perfect way to introduce them to new foods.


Breakfast Board DIY Tutorial
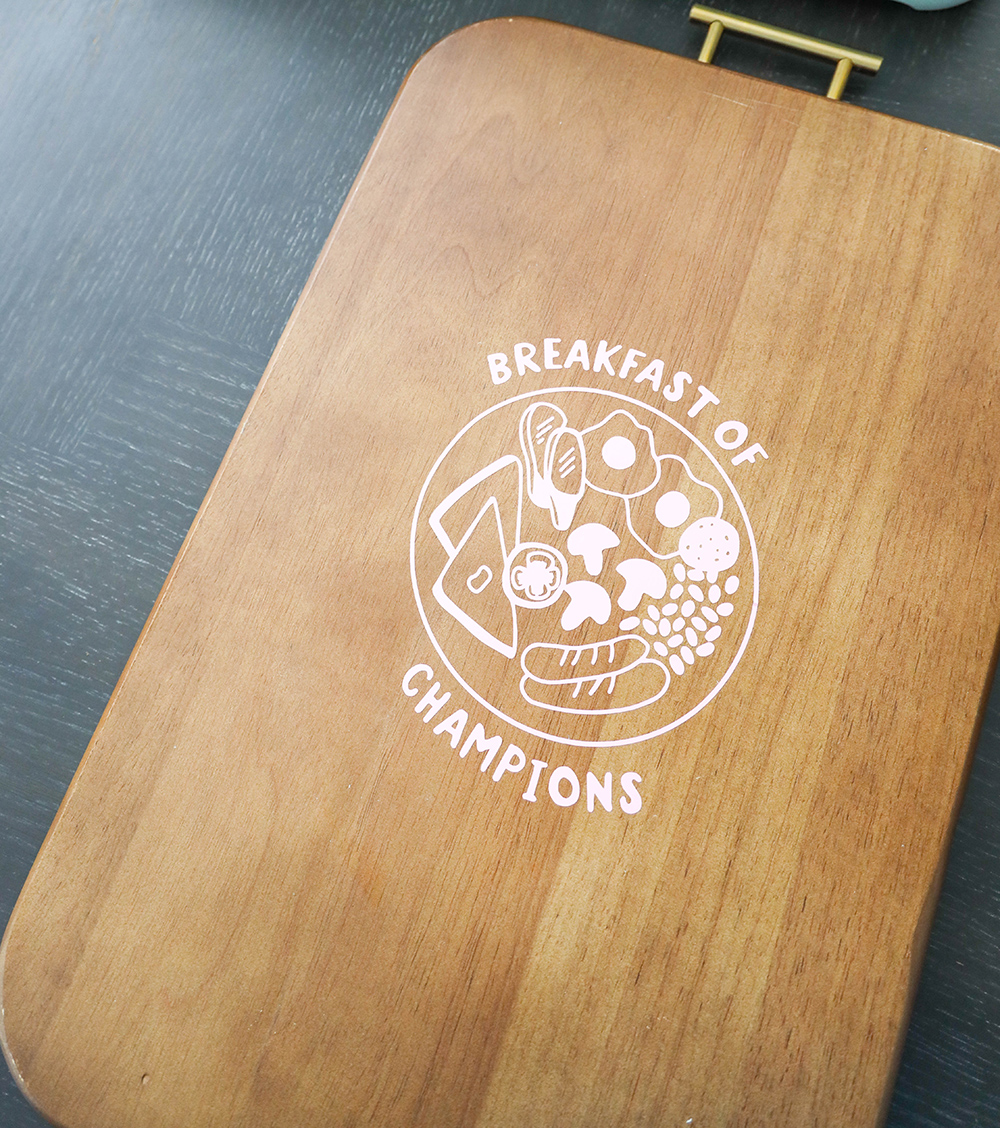
Making a breakfast board with the new Cricut Explore 3 is so easy! I love that I’m able to use smart materials like the Permanent Smart Vinyl and make faster cuts with the Explore 3. If you don’t have an Explore 3 you can definitely use a Maker 3 or a Cricut Joy for this project.
Supplies:
- Cricut Explore 3
- Cricut Design Space – get the design file here (highly recommend premium access membership for access to more designs)
- Permanent Smart Vinyl – I used light pink
- Cricut Transfer Tape
- Weeding Tool
- Cricut XL Scraper
- Cutting board (here’s a few options I love: , , , )
Instructions:
- First start by selecting your design in Cricut Design Space. I linked the file that I used above.
- After you select your design, size it according to the cutting board you’ll be using. Then, select “make it” in Design Space.
- Select your material. I used Light Pink Permanent Smart Vinyl but you can choose any color you desire. Just be sure to use the Permanent Smart Vinyl so that your design will withstand the food and any dishwashing. (You can use removable vinyl if you plan on switching out your design from time to time).
- Watch your Cricut Explore 3 cut your design in minutes!
- Weed the vinyl using your weeding tool after the design is cut.
- Apply the transfer tape over the top of the weeded vinyl.
- Once the vinyl is adhered to the transfer tape, lay the transfer tape onto the board. Use the scraper to firmly apply the vinyl to the board.

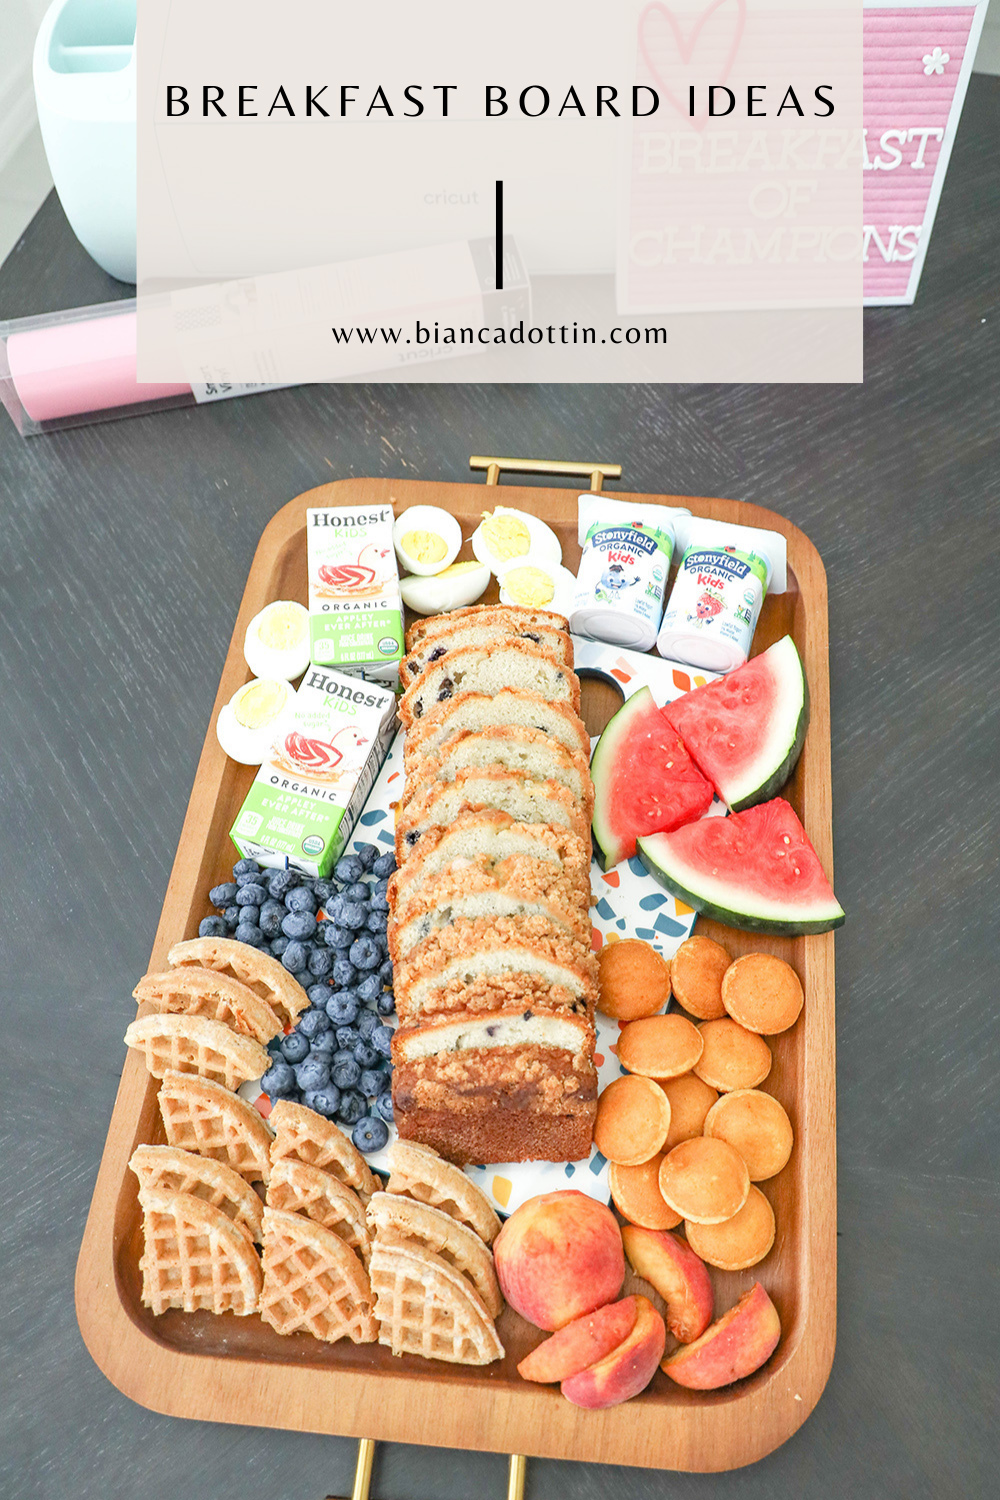
Breakfast Board Ideas and Tips for Building Your Own Breakfast Board
Creating a grazing board is simple as ever. One of the things I love the most about making them is that there are no rules. I can include different ingredients every single time and my kids would love it. They’re so much fun to put together and you can get really creative with them. The possibilities are endless. You can mix savory and sweet. Combinations for different textures and colors are infinite. Each person can really hand pick a breakfast they love from the options you provide on the breakfast board. It’s what I like to call the ultimate solution to dining with picky eaters.
With a little bit of planning you can create something so easy for those busy mornings at home. This will definitely step up your game and make your morning routine a little fancy. If you have one of these a few times a week you could even make your weekly family routine a bit easier.
Keep it simple
When you’re making your board, keep it simple. You want to make sure that your board isn’t too big. You don’t want any of the food to go to waste so keep it simple and small with just enough food to fill your family. If you’re having guests you can keep a back stock of the foods in your kitchen nearby if you need to refill the board.
One bonus about a breakfast board is that you don’t have to cook all of the ingredients. You can use store bought foods like pastries, fruits, yogurt and bagels. Using store bought ingredients cuts down on time. If store bought isn’t your thing you can bake ahead things like muffins, pastries or even pop tarts for a little razzle dazzle.
Stick to 2-3 main foods as your base
Pancakes and waffles are my go to! However there are so many breakfast dishes that you can use as your base for your breakfast board. Some great foods for a main base are bagels, eggs bites, these baked avocado eggs or even pecan banana bread. Ask your family if they have any breakfast board ideas or food they want to incorporate.
Prep your toppings and cold dishes first
When you’re creating your board you want to make sure that your topping and cold dishes are made first. You can keep these cold in the refrigerator while you’re prepping any hot items.
Use small bowls to add dimension
I love to use bowls as a part of our board for things like toppings and sauces. Things like syrup, chocolate chips and nutella fit perfectly into bowls to place them on the board. They make the perfect toppings if we’re having pancakes or waffles. The great thing about a breakfast board is that it you can customize it completely to your family’s needs. If you are hosting guests in your home for a brunch you can customize it for your guests as well.
Make your hot dishes last
Save your hot dishes for last. The last thing that you want is to serve cold pancakes and waffles on your dish.
I hope you loved these breakfast board ideas and easy DIY! Share some of your favorite breakfast board ideas below!
Grab a tray for your DIY here:


Looking for other fun DIY ideas? Check out these Simple Cricut Projects for Beginners and this DIY movie night sign.


Such a cute idea! I think my daughter would love having me make one of these for her! I will absolutely serve up a breakfast board the next time my granddaughters come to visit!